
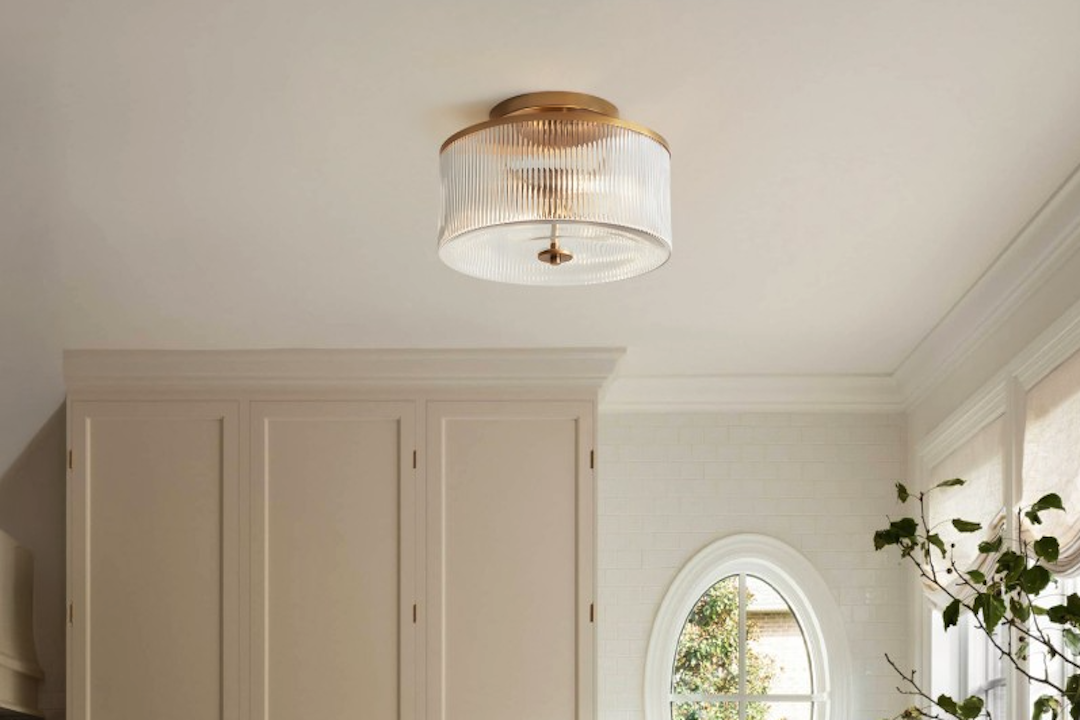
Looking for a kitchen light that’s both practical and a bit of a showstopper? A glass kitchen ceiling light with modern vertical stripes could be exactly what you need. It offers a clean, contemporary look that can really elevate your kitchen’s style without being overly fussy. Think of it as a subtle design upgrade that casts beautiful light, making your cooking space feel more intentional and inviting.
You might associate stripes with nautical themes or classic shirts, but in lighting 1homedesign, vertical stripes offer a unique set of benefits beyond just aesthetics. They’re a clever design choice for several reasons.
Visual Elongation and Height
One of the most immediate visual impacts of vertical stripes is their ability to make things appear taller or longer. In a kitchen, especially if you have standard or lower ceilings, this can be a real advantage.
- Creating an Illusion of Space: Vertical lines naturally draw the eye upwards. This visual trick can make your kitchen feel less confined and more open. It’s like a subtle architectural intervention implemented through your lighting.
- Balancing Proportions: If you have wider, shorter walls, a ceiling light with vertical stripes can help to balance out those proportions, adding a sense of verticality where it might otherwise be lacking. It stops the room from feeling too ‘squat’.
Diffused Light with Directional Interest
While many glass lights are great for diffusion, vertical stripes add another layer of complexity to how the light is cast.
- Gentle Light Spread: The glass itself will diffuse the light from the bulb, preventing harsh glare. This creates a softer, more ambient glow that’s pleasant to work under.
- Subtle Streaks and Shadows: The vertical lines aren’t just for show when the light is off. When illuminated, they create very subtle, almost imperceptible streaks of light and shadow. This adds a dynamic element to the lighting, preventing it from looking flat or one-dimensional. It’s not harsh patterning, but a gentle visual texture.
A Nod to Modernism and Art Deco
Vertical stripes aren’t just a contemporary trend; they have roots in design history, particularly during the Art Deco era.
- Clean, Architectural Lines: Modern design often favors clean lines and geometric shapes. Vertical stripes fit perfectly into this aesthetic, offering a sense of order and sophistication. They feel purposeful, not random.
- Art Deco Influence: Think of those iconic Art Deco skyscrapers and interior elements. Many featured strong vertical lines, symbolizing progress and height. Incorporating this motif into your kitchen light can add a touch of timeless elegance with a modern twist. It’s a sophisticated echo of a beloved design period.
Choosing the Right Glass: Clarity, Texture, and Color
The type of glass used in your ceiling light plays a huge role in its overall look, how it diffuses light, and how well it integrates with your kitchen’s existing materials. It’s not just “glass”; there are many variations.
Clear Glass: Unobstructed Brilliance
Clear glass is a popular choice for good reason. It’s straightforward and allows the most light to pass through.
- Maximum Light Output: If your kitchen needs as much illumination as possible, clear glass is your best bet. It won’t significantly block or absorb the light from your bulb.
- Bulb as a Design Element: With clear glass, your light bulb becomes visible. This means you have an opportunity to use a decorative bulb, like an Edison-style filament bulb, to further enhance the aesthetic. This effectively turns the bulb into part of the fixture’s design.
- Easy to Clean: Generally, clear glass surfaces are easier to wipe down and maintain their sparkle than textured or frosted options. Smudges are more visible, but also easier to target.
Frosted or Opal Glass: Soft and Diffused
For a softer, more subdued light, frosted or opal glass is an excellent alternative.
- Even Light Distribution: These types of glass excel at diffusing light evenly across a wider area, eliminating harsh shadows and hot spots. This creates a more ambient and comfortable lighting environment.
- Concealing the Bulb: If you’re not keen on seeing the light bulb itself, frosted or opal glass will conceal it, streamlining the fixture’s appearance. It keeps the focus on the fixture’s shape and light rather than the internal mechanics.
- Gentle Glow: The light emitted is softer and less intense, which can be ideal for a kitchen where you want a more welcoming, less utilitarian feel. It’s perfect for creating a relaxed atmosphere.
Textured Glass: Adding Depth and Interest
Beyond just smooth surfaces, textured glass offers another layer of visual appeal.
- Subtle Refractions: Textured glass surfaces, even with vertical stripes, create subtle refractions and patterns when the light passes through them. This adds depth and visual interest to the light itself, making it more dynamic.
- Hiding Imperfections: Fingerprints and dust are often less noticeable on textured glass compared to perfectly smooth, clear surfaces, which can be a practical benefit in a busy kitchen.
- Unique Aesthetic: From reeded glass (which is inherently vertically striped) to subtle dimples or waves, textured glass can provide a unique finish that sets your light apart. It’s a way to add character without going overboard.
Tinted Glass: A Touch of Color
While less common for kitchen ceiling lights, tinted glass can introduce a subtle color element.
- Warmth or Coolness: A very light smoke gray or amber tint can warm up or cool down the light output slightly. This can be used to complement your overall kitchen color palette.
- Sophisticated Touch: Tinted glass, especially in subtle shades, can add a layer of sophistication and uniqueness to your fixture. It’s a deliberate design choice for a specific feel.
- Careful Consideration: Be mindful that tinted glass will reduce the overall light output and can alter the appearance of food or surfaces. Use sparingly and with purpose in a kitchen.
Sizing and Placement: Getting it Just Right
A beautifully designed light fixture won’t look its best if it’s the wrong size or hung in an awkward spot. Getting the scale and placement right is crucial for both aesthetics and functionality.
The Goldilocks Principle: Not Too Big, Not Too Small
Finding the right size for your kitchen ceiling light isn’t an exact science, but there are some helpful guidelines.
- Overall Kitchen Dimensions: A common rule of thumb is to calculate the approximate diameter of your fixture. Add the length and width of your room in feet. For example, a 10’ x 12’ kitchen (22 feet total) might suggest a 22-inch diameter fixture. This is a starting point, not a strict rule.
- Consider the Island/Work Area: If the light is specifically over an island or a primary work area, you’ll want its size to be proportional to that specific zone. It shouldn’t get lost, nor should it completely overwhelm the space. Aim for about two-thirds the width of the island/area it’s illuminating.
- Visual Weight: Beyond just diameter, consider the “visual weight” of the fixture. A light with a lot of heavy metal accents might feel larger than a more slender, all-glass fixture of the same diameter.
Where to Hang It: More Than Just the Center
While a central ceiling light is traditional, modern kitchen design often benefits from more thoughtful placement, especially with a feature fixture.
- Central Kitchen Light: If it’s your primary central light, ensure it illuminates the main walkways and general prep areas adequately. Its light needs to spread far enough without leaving dark corners.
- Over an Island/Peninsula: This is a very popular spot for a stylish ceiling light. It provides task lighting for prep and serving, and visually defines the island as a focal point. Ensure it’s high enough not to obstruct views or head space.
- Over a Dining Nook: If your kitchen incorporates a small dining area, a tastefully lit vertical stripe fixture can create a cozy, defined zone. The light should be centered over the table and hang at a height that illuminates the table without blinding diners.
Height Matters: Function and Aesthetics
The height at which a ceiling light is hung can drastically impact its effectiveness and visual appeal.
- Ceiling Height: For standard 8-foot ceilings, you generally want at least 7 feet of clearance below the fixture. If it’s over a general walkway, this is essential to avoid head bumps.
- Over an Island/Table: When hanging over an island or table, a good starting point is about 30-36 inches above the surface. This allows for good task lighting without blocking conversation or views across the table. Adjust based on your specific fixture’s design and your family’s height.
- Layering Light: Remember that a stylish ceiling light is often just one component of your kitchen’s lighting scheme. It should work in harmony with recessed lights, under-cabinet lighting, and perhaps even sconces to create a layered and functional illumination. The ceiling light is usually for general or ambient light, with other fixtures filling in the gaps.
Material Compatibility: Beyond Just Glass
While glass is the star of the show, the metal accents and other materials used in the fixture are equally important for integrating it into your kitchen’s design.
Metallic Finishes: The Jewelry of Your Kitchen
The metallic components of your fixture, like the canopy, frame, or cap, are akin to the jewelry of your kitchen. They should complement your existing hardware.
- Matching Hardware: Look at the finishes on your kitchen cabinet pulls, faucet, and any other visible metals. Do you have brushed nickel, matte black, oil-rubbed bronze, or polished brass?
- Brushed Nickel/Chrome: These are versatile and timeless, often associated with a clean, contemporary look. If your kitchen has a lot of stainless steel appliances, these are good matches.
- Matte Black: Very popular in modern design, matte black offers a striking contrast and a sophisticated edge. It can ground a light fixture and provide a strong accent.
- Polished Brass/Gold: These finishes add a touch of warmth and luxury. They can work beautifully in kitchens that lean towards a slightly more glam or classic modern aesthetic.
- Oil-Rubbed Bronze: For kitchens with a more rustic, industrial, or transitional feel, oil-rubbed bronze (or similar dark, antiqued finishes) can be a perfect choice, offering character and depth.
- Mixing Metals (Carefully): While matching is safe, tastefully mixing metals can add depth and interest. For example, a matte black light fixture might look striking in a kitchen with brushed nickel cabinet pulls, as long as there’s another element (like a black pull on a pantry door or an accent) to tie it in. The key is intentionality and balance, not random clashes.
Types of Suspension: How it Hangs
The way your light fixture hangs from the ceiling also contributes to its overall aesthetic and how it integrates into the space.
- Flush Mount: These fixtures sit directly against the ceiling, making them ideal for lower ceilings where every inch of headroom counts. They offer a very streamlined and discreet look.
- Semi-Flush Mount: These hang just a few inches below the ceiling, providing a bit more visual interest than a flush mount without taking up too much vertical space. They often have a decorative stem or short rod.
- Pendant: While often used individually over an island, a single larger pendant could serve as a central kitchen light if sized appropriately. They typically hang lower on a chain or rod, offering more of a statement.
- Linear: For longer islands or kitchen areas, a linear fixture with multiple light sources (which could have a vertical stripe glass element on each) can provide comprehensive and balanced lighting.
Beyond Metal: Wood Accents?
Some modern fixtures incorporate other materials, like wood, into their design. This can be a beautiful way to add warmth.
- Wood with Glass: A light wood accent (like natural oak or maple) paired with glass and vertical stripes can bring a touch of Nordic modernism or a soft organic feel to your kitchen.
- Integrating Textures: Consider how these materials interact with your existing cabinetry, flooring, or countertops. The goal is to create a cohesive, layered look.
Installation and Maintenance: Practicalities for Longevity
Even the most beautiful light fixture needs to be installed correctly and maintained properly to continue looking its best and functioning safely for years to come.
Professional Installation: Safety First
While some DIYers might feel comfortable with electrical work, installing a ceiling light, especially a heavier glass one, is often best left to a professional.
- Electrical Safety: Improper wiring can be a significant fire hazard. An electrician ensures that the fixture is correctly grounded and wired to the circuit, reducing risks.
- Weight and Support: Glass fixtures can be heavier than anticipated. An electrician will ensure that the ceiling junction box and mounting hardware are robust enough to safely support the fixture’s weight. They’ll also know how to reinforce it if needed.
- Code Compliance: Professional installation ensures that your electrical work meets local building codes, which is important for safety and resale value.
- Time and Tools: Professionals have the right tools and expertise to get the job done efficiently and safely, saving you potential frustration and costly mistakes.
Keeping it Clean: Sparkle and Shine
Glass fixtures, especially those with vertical stripes, benefit from regular cleaning to maintain their clarity and brilliance.
- Regular Dusting: A soft, dry microfiber cloth is usually sufficient for weekly or bi-weekly dusting of the exterior to prevent buildup.
- Gentle Cleaning Solution: For smudges or grime, use a mixture of warm water and a small amount of mild dish soap, or a dedicated glass cleaner.
- Soft Cloths, No Abrasives: Always use soft cloths (like microfiber) to avoid scratching the glass. Avoid harsh or abrasive cleaners, as these can damage certain glass finishes or metal accents.
- Turn Off Power: Before cleaning, always turn off the power to the light fixture at the circuit breaker for safety. This is a non-negotiable step.
- Inside and Out: If the fixture allows, periodically clean the inside of the glass as well, where dust and some insect debris can accumulate, dulling the light output. For striped glass, make sure to wipe gently along the grooves.
Bulb Replacement: The Right Wattage and Type
Choosing the correct bulb isn’t just about brightness; it also affects the look and heat output.
- Wattage Limits: Always adhere to the maximum wattage specified for your fixture. Overloading can lead to overheating and damage.
- LED is King: LED bulbs are highly recommended for kitchen ceiling lights.
- Energy Efficiency: They consume significantly less energy than incandescent or halogen bulbs, saving you money.
- Long Lifespan: LEDs last much longer, reducing the frequency of bulb changes, which can be tricky for ceiling fixtures.
- Less Heat: LEDs produce very little heat, which is a bonus in a busy kitchen and for the longevity of your fixture.
- Color Temperature: Consider the color temperature (Kelvin, K) of your bulbs.
- Warm White (2700K-3000K): Creates a cozy, inviting atmosphere.
- Neutral White (3500K-4000K): Often preferred for kitchens as it provides good task lighting without feeling too clinical. It’s a balanced, daylight-like illumination.
- Cool White (5000K+): Can be stark and less inviting; generally, not recommended for most home kitchens.
- Dimmable Options: If your fixture is dimmable (and you have a dimmer switch installed), choose dimmable LED bulbs to allow you to adjust the light intensity for different tasks or moods. This adds great versatility to your kitchen lighting.
By considering these practical aspects, you ensure that your stylish glass kitchen ceiling light with modern vertical stripes not only looks fantastic but also functions perfectly and safely for many years to come. It’s an investment in both style and usability.